Java Development Kit (JDK) 17
Installing the most recent (September 2021) long-term support (LTS) release.
This document outlines the process to install the OpenJDK version of JDK 11; for Windows and OS X, the specific distribution will be that provided by Amazon Corretto.
System requirements
Before installing, please verify that your system meets or exceeds the requirements for JDK 17, as specified in Oracle JDK 17 Certified System Configurations.
Download and installation
Windows
Download the Windows x64 MSI (installer file) for JDK 17 from Downloads for Amazon Corretto 17 and follow the installation instructions at Amazon Corretto Installation Instructions for Windows 7 or Later.
Important: On the Custom Setup screen, use the Browse button to change the installation directory from its default value to C:\Program Files\Java\ (please be careful to use the precise spelling and casing shown here).
Download the macOS x64 PKG (package file) for JDK 17 from Downloads for Amazon Corretto 17 and follow the installation instructions at Amazon Corretto Installation Instructions for macOS 10.13 or later.
Linux Ubuntu
Run the following commands in a Terminal window:
IntelliJ IDEA configuration
Read these steps carefully, then follow them with equal care. In most cases, step 3 can be done very simply, if you don’t rush through it; otherwise, it takes longer and is more error-prone.
In IntelliJ, use the File/Project Structure menu option in the workspace, or the Ctrl+Alt+Shift+S (Windows and Linux) or ⌘+; (OS X) key combinations to open the Project Structure dialog.
In the left-hand (navigator) panel, select Platform Settings/SDKs. In the vertical panel to the right of the navigator panel, you should see “11” (possibly “corretto-11”), along with one or more items beginning with “Android API”./
Click the plus sign (+) above the list of SDKs to display the pop-up menu of SDK options. In most cases, you should see the JDK 17 you just installed in this menu; if so, select it. If you do not see it, select “Add JDK”, and browse to the directory where JDK 17 was installed in the “Download and installation” steps; select that destination directory and click the Open button.
If the Name field in the top-center-right of the Project Structure dialog displays “corretto-17” (or anything other than just “17”), edit it to read simply “17”.
Как установить java 17 на windows 10
JDK installers now support only one version of any Java feature release. You can’t install multiple versions of the same feature release.
If you install an older version of a JDK when the newer version of the same feature family already exists, an error is displayed, prompting you to uninstall a newer JDK version if an older version has to be installed.
JDK is installed in /Program Files/Java/jdk- <FEATURE> where <FEATURE> is the feature release number. For example, JDK 17 .0.1 is installed in /Program Files/Java/jdk- 17 .
JDK Installation Instructions for Windows
You run a self-installing executable file to unpack and install the JDK on Windows computers.
Install JDK on Windows computers by performing the actions described in the following topics:
Downloading the JDK Installer
Access Java SE Downloads page and click Accept License Agreement . Under the Download menu, click the Download link that corresponds to the .exe for your version of Windows.
Download the file jdk- 17 . interim.update.patch _windows-x64_bin.exe .
Verify the successful completion of file download by comparing the file size on the download page and your local drive. Alternatively, you can ensure that the downloaded file’s checksum matches the one provided on the Java SE Downloads page.
Installing the JDK from the JDK .exe Installer
- Start the JDK 17 installer by double-clicking the installer’s icon or file name in the download location.
- Follow the instructions provided by the installer.
- After the installation is complete, delete the downloaded file to recover the disk space.
During installation, the following files are copied to the location mentioned:
Alternatively, you can run these executables directly from the JDK’s bin directory.
Installing the JDK from the MSI Enterprise Installer
The JDK MSI Enterprise Installer is packaged as a .msi installer and runs with minimal dialogs. It supports silent installation of the JDK and is customizable using command line parameters.
You must have administrative permissions install JDK 17 .
- Download jdk- 17 _windows-x64_bin.msi .
- Double click the .msi file to run the installer.
Installing the JDK from the Command Line
You can install the JDK by downloading the appropriate Oracle JDK MSI Enterprise Installer for your system and running it from the command line.
- Download jdk- 17 _windows-x64_bin.msi .
- Open an MS-DOS prompt with Administrative permissions.
- Run one of the following commands depending on the type of installation that you want to perform:
- Basic UI mode:
- Silent mode:
installer.msi is the name of the MSI Enterprise JDK Installer that you obtained in the previous step.
Creating a Log File
You can use a log file to verify that an installation succeeded.
To create a log file describing the installation, append /L C:\ path \setup.log to the install command and scroll to the end of the log file to verify.
The following is an example of creating a log file:
In this example, the log is written to the C:\ path \setup.log file.
Installing the JDK Silently
Instead of double-clicking or opening the JDK installer, you can perform a silent, non interactive, JDK installation by using command-line arguments.
- The notation jdk stands for the downloaded installer file base name, such as jdk- 17 _windows-x64_bin.exe .
- You don’t need to run the ADDLOCAL command anymore as everything gets installed by default.
Beginning to Use the JDK
Use the Java Development Kit in the Windows Start menu to access information related to Reference Documentation.
During JDK install, Java menu items are added to the Windows Start menu to provide easy access to Reference Documentation, which is online documentation web page.
During JDK installation and uninstallation processes, the appropriate start menu items are updated so that they are associated with the latest JDK version on the system
The Windows 10 has a Start menu; however, the menu is not available in Windows 8 and Windows 8.1. The JDK and Java information in Windows 8 and Windows 8.1 is available in the following Start directory: %ALLUSERSPROFILE%\Microsoft\Windows\Start Menu\Programs .
Uninstalling the JDK on Windows
Uninstalling the JDK in Silent Mode
You can use the command line for uninstalling the JDK.
For example, to uninstall JDK 15, run the command:
- This command can be run from anywhere.
- The msiexec.exe executable is located in the windows system directory.
- A reboot is required only if some files are in use during uninstallation; it is not necessary everytime. However, to manually suppress reboot while uninstalling, append REBOOT=R option to the command.
- Append /l “C:\< path >setup.log” option to the command if you want to create a log file describing the uninstallation status.
Windows Installer dialog appears prompting you for confirmation. Click Yes to uninstall JDK.
Finding the JDK Registry Key and UninstallString Value
- Go to Start and type Regedit .
- In the Registry Editor, go to HKEY_LOCAL_MACHINE/Software/Microsoft/Windows/CurrentVersion/Uninstall .
Under the Uninstall folder, you will find many registry entries within curly brackets.
Highlight Uninstall folder before performing search for a particular registry.
The registry key is highlighted on the right-hand side of the pane and values of various uninstall strings are displayed on the left-hand pane.
JDK Installation Troubleshooting
The topic provide tips for resolving issues while installing JDK.
System Error During Decompression
If you see the error message: system error during decompression , then there might not be enough space on the disk that contains the TEMP directory.
Program Cannot Be Run in DOS Mode
If you see the error message: This program cannot be run in DOS mode , then do the following:
Open the MS-DOS shell or command prompt window.
Right-click the title bar.
Select the Program tab.
Ensure that the item Prevent MS-DOS-based programs from detecting Windows is not selected.
Select OK again.
Exit the MS-DOS shell.
Restart your computer.
Characters That Are Not Part of the System Code Page
The associated bug number is 4895647.
Cleanup the Registry After a Failed JDK Uninstall
Sometimes, attempts to uninstall JDK through the Windows Add/Remove program leave behind some Java entries in the registry that are not fully removed. These left behind registry entries can cause problems in installing a new version of Java. The following are the methods to cleanup registry entries:
- Program Install and Uninstall troubleshooter (Recommended Method)
- Manual Registry Edit
Program Install and Uninstall troubleshooter (Recommended Method)
Run the Program Install and Uninstall troubleshooter to repair the corrupted registry keys that prevent programs from being completely uninstalled, or blocks new installations and updates.
Manually edit the registry (Use this only if the Fix It utility does not work)
Incorrectly editing your registry may severely damage your system. You should back up any valued data from your computer before making changes to the registry.
Use the File->Export functionality of the registry editor to save the registry key before deleting. In case you deleted the wrong registry key, you can restore the registry from your saved backup file, by using the File->Import functionality.
To delete the registry key:
Highlight the key, Right click and select Delete .
Click Yes when prompted.
The JDK gets uninstalled.
Fixing Shim Situation when JDK 17 and JRE 8 is Installed
When you install JDK 17 and then install JRE 8, and then run the java -version command, 1.8.0 is displayed in the output instead of 17 . This is because the javapath is placed before JDK 17 location in the user environment path.
This is a bug with the JRE 8 installer. To fix this shim situation, uninstall and reinstall JDK 17.
How to Install Java on Windows
The Java Development Kit (JDK) is software used for Java programming, along with the Java Virtual Machine (JVM) and the Java Runtime Environment (JRE). The JDK includes the compiler and class libraries, allowing developers to create Java programs executable by the JVM and JRE.
In this tutorial, you will learn to install the Java Development Kit on Windows.
- A system running Windows 10.
- A network connection.
- Administrator privileges.
Note: Develop your core app services on PNAP’s Bare Metal Cloud servers to ensure superior performance. It’s cloud native and the perfect environment for the entire SDLC.
Check if Java Is Installed
Before installing the Java Development Kit, check if a Java version is already installed on Windows. Follow the steps below:
- Open a command prompt by typing cmd in the search bar and press Enter.
- Run the following command:

The command outputs the Java version on your system. If Java isn’t installed, the output is a message stating that Java isn’t recognized as an internal or external command.
Note: If you need to set up Java on a different system, check out our tutorials for installing Java on Ubuntu, Fedora, Raspberry Pi, CentOS 8, and CentOS 7.
Download Java for Windows 10
Download the latest Java Development Kit installation file for Windows 10 to have the latest features and bug fixes.
- Using your preferred web browser, navigate to the Oracle Java Downloads page.
- On the Downloads page, click the x64 Installer download link under the Windows category. At the time of writing this article, Java version 17 is the latest long-term support Java version.
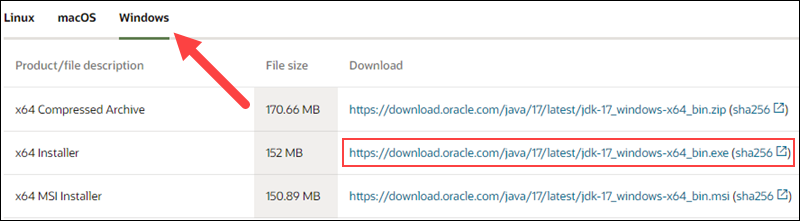
Wait for the download to complete.
Install Java on Windows 10
After downloading the installation file, proceed with installing Java on your Windows system.
Follow the steps below:
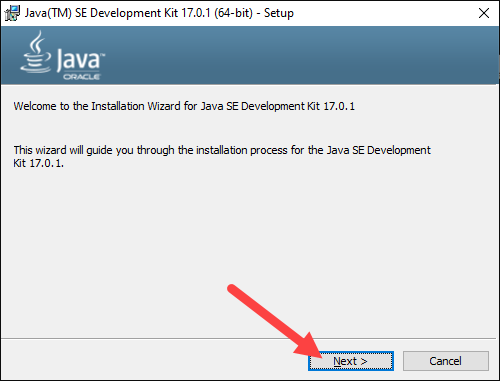
Step 1: Run the Downloaded File
Double-click the downloaded file to start the installation.
Step 2: Configure the Installation Wizard
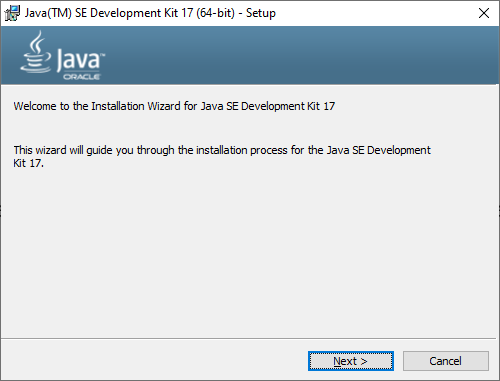
After running the installation file, the installation wizard welcome screen appears.
1. Click Next to proceed to the next step.
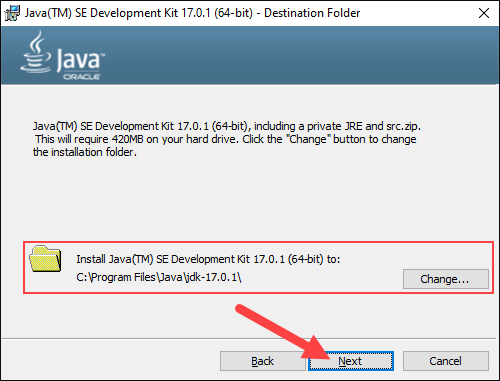
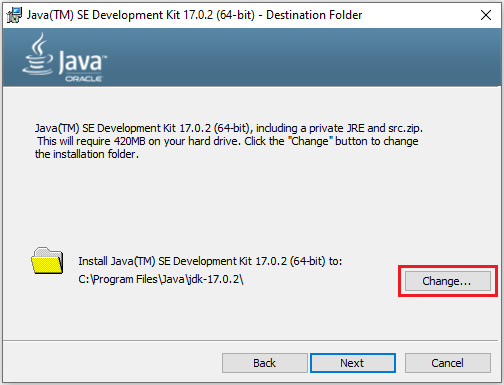
2. Choose the destination folder for the Java installation files or stick to the default path. Click Next to proceed.
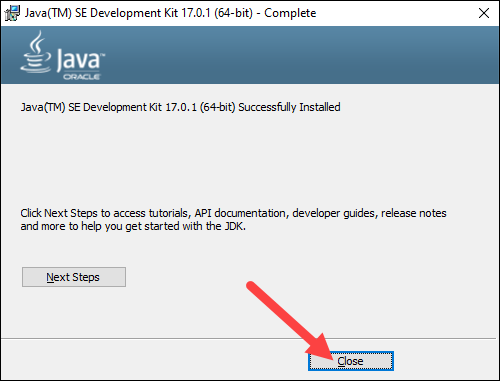
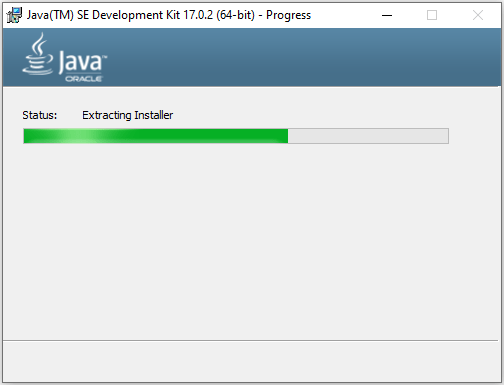
3. Wait for the wizard to finish the installation process until the Successfully Installed message appears. Click Close to exit the wizard.
Set Environmental Variables in Java
Set Java environment variables to enable program compiling from any directory. To do so, follow the steps below:
Step 1: Add Java to System Variables
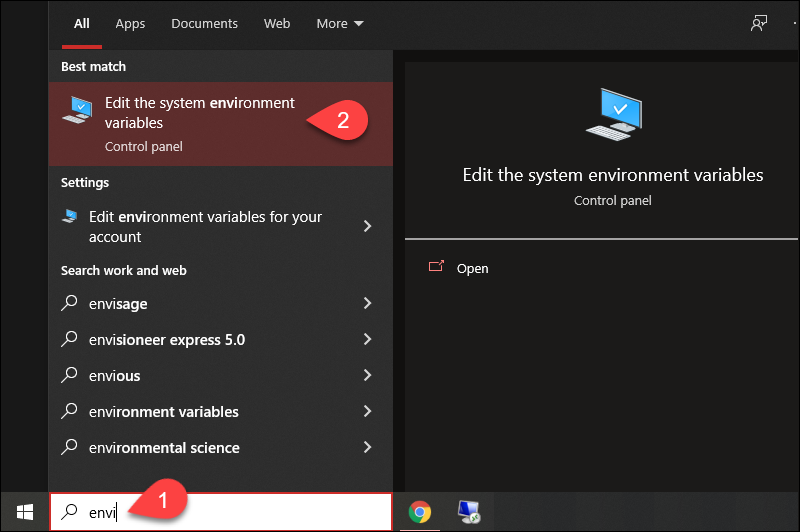
1. Open the Start menu and search for environment variables.
2. Select the Edit the system environment variables result.
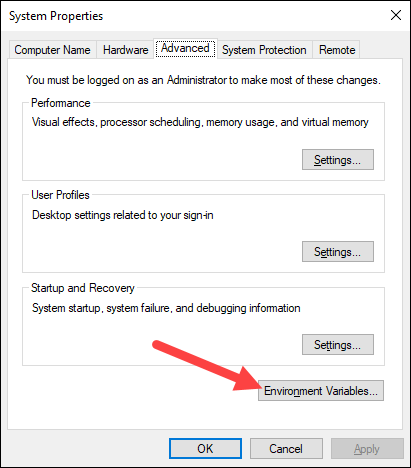
3. In the System Properties window, under the Advanced tab, click Environment Variables…
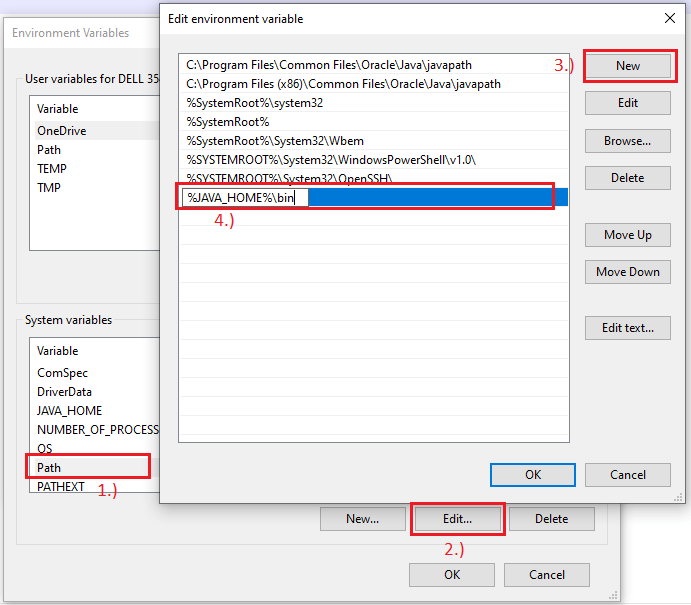
4. Under the System variables category, select the Path variable and click Edit:

5. Click the New button and enter the path to the Java bin directory:
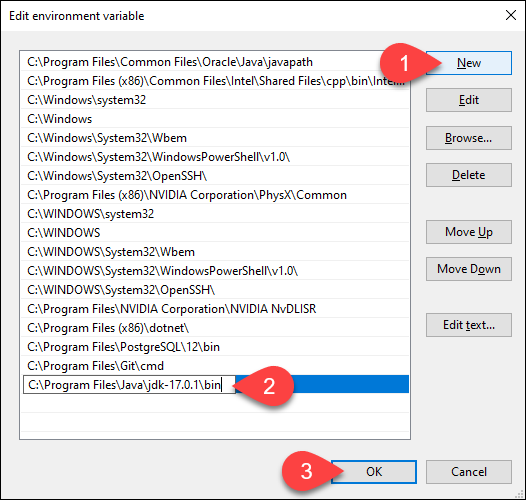
Note: The default path is usually C:\Program Files\Java\jdk-17.0.1\bin.
6. Click OK to save the changes and exit the variable editing window.
Step 2: Add JAVA_HOME Variable
Some applications require the JAVA_HOME variable. Follow the steps below to create the variable:
1. In the Environment Variables window, under the System variables category, click the New… button to create a new variable.
2. Name the variable as JAVA_HOME.
3. In the variable value field, paste the path to your Java jdk directory and click OK.
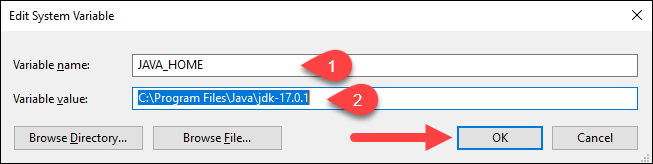
4. Confirm the changes by clicking OK in the Environment Variables and System properties windows.
Test the Java Installation
Run the java -version command in the command prompt to make sure Java installed correctly:

If installed correctly, the command outputs the Java version. Make sure everything works by writing a simple program and compiling it. Follow the steps below:
Step 1: Write a Test Java Script
1. Open a text editor such as Notepad++ and create a new file.
2. Enter the following lines of code and click Save:
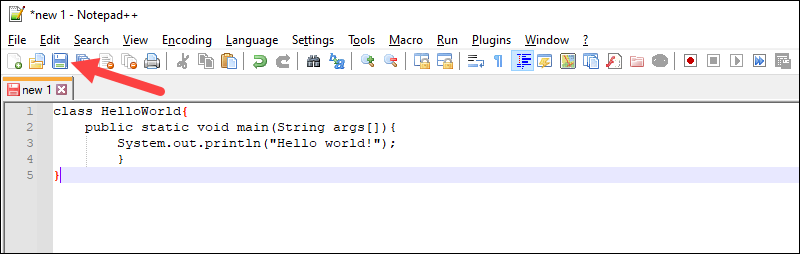
3. Name the file and save it as a Java source file (*.java).
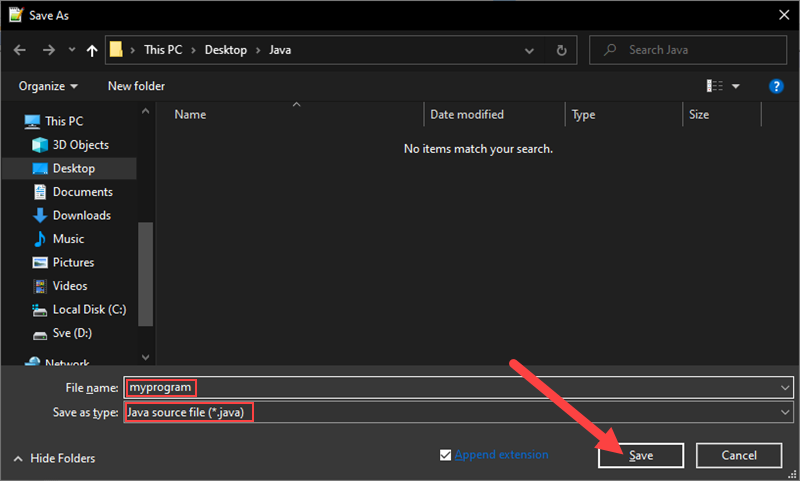
Note: When using Notepad, select All files for the Save as type option and add the .java extension to the file name.
Step 2: Compile the Test Java Script
1. In the command prompt, change the directory to the file’s location and use the following syntax to compile the program:

After a successful compilation, the program generates a .class file in the file directory.
2. Run the program with the following syntax:

The output shows that the program runs correctly, displaying the Hello world! message.
Note: Our Knowledge Base also has a guide on how to install Java on MacOS.
This tutorial showed how to install the Java Development Kit on a Windows system. If you are interested in learning more about Java, read our list of 13 best Java IDEs for writing, debugging, and testing Java code.
Java JDK 17 — 32 + 64 bit — где скачать джаву?

Вышел релиз Minecraft 1.18.1, и теперь игра требует Java JDK 17. Я вам расскажу где его скачать, как установить и запустить новейшую версию игры.
Скачать Java JDK 17:
Собственно, теперь необходимо указать лаунчеру именно данную JAVA в настройках.
Download and Install Oracle JDK 17
In this post, I’d like to share with you about how to download and install Oracle JDK 17 from official source, on Windows operating system. Oracle JDK 17 is a distribution of JDK 17 under Oracle’s license.
1. Download Windows Installer for Oracle JDK 17
You should get the file jdk-17_windows-x64_bin.exe downloaded. Note that Oracle also provides SHA256 checksum for the file, for use in case you want to verify integrity of the file:
certutil -hashfile jdk-17_windows-x64_bin.exe SHA256
Compare the output of this command against the value posted by Oracle in the corresponding sha256 link.
2. Install Oracle JDK 17 on Windows
Just click Next to start installing JDK 17 for your Windows computer. It should be very quick. The installer will update Java Path in C:\Program Files\Common Files\Oracle\Java\javapath directory. Now you can open a new command prompt and type java –version to verify:

That means you have successfully installed Oracle JDK 17 on your Windows operating system. If it doesn’t work, follow this guide to update system environment variables for Java manually.
To watch the steps in action, I recommend you watch the following video:
Learn more:
About the Author:
 Nam Ha Minh is certified Java programmer (SCJP and SCWCD). He started programming with Java in the time of Java 1.4 and has been falling in love with Java since then. Make friend with him on Facebook and watch his Java videos you YouTube.
How To Install Java 17 On Windows
It provides all the steps required to install Oracle Java 17 i.e. Oracle JDK 17 on Windows 10 and get started with Java using the Hello World example.
This tutorial provides all the steps required to install the Oracle Java 17 officially distributed by Oracle for Windows. It provides the steps required to install Oracle JDK 17 on Windows 10. The steps should be the same for other versions of the Windows operating system.
Notes: The official installer provided by Oracle does not include the bundled JRE with JDK since Java 11. It can be installed separately if required. We can use Java 17 free for general-purpose computing usage. You can also, follow How To Install OpenJDK 17 On Windows to install the open-source version of Java 17 i.e. OpenJDK 17. Java 17 is using the Commercial License and OpenJDK 17 is using the open-source GNU General Public License v2, with the Classpath Exception (GPLv2+CPE).
Java 17 is an LTS version which means there will be long-time support from Oracle for the same. The premier support will be available till September 2026 and extended support will be available till September 2029.
You may also install the popular IDEs to develop Java applications by following — How To Install Eclipse For Java On Windows, How To Install IntelliJ IDEA for Java on Windows, How To Install NetBeans On Windows, and How To Install VSCode For Java On Windows. You may also follow the How To Install OpenJDK 17 On Ubuntu to install the latest OpenJDK on Ubuntu and How To Install Java 17 On Ubuntu to install Oracle JDK.
Notes: New version of this tutorial is available at How To Install Java 18 On Windows.
Step 1 — Download JDK
Open the browser and search for Download JDK 17 or click the link to download from the Oracle website. It will show the JDK download page as shown in Fig 1.
Now click the X64 Installer link to start downloading JDK 17.
Step 2 — Install JDK
Now execute the JDK installer by double-clicking it. It might ask system permission before starting the installation. Click on yes to allow the installer to execute itself. It shows the installer welcome screen as displayed in Fig 2.
Click the Next Button to initiate the installation process. The next screen shows options to change the installation path. We can change the installation location on this screen if required as displayed in Fig 3.
Now click the Next Button to start the installation. It will show the progress as displayed in Fig 4.
It shows the success screen after completing the installation as shown in Fig 5.
Now open the Command Prompt and type the command java -version to confirm whether it’s installed successfully as mentioned in Fig 6.
It might show the message — java is not recognized as an internal or external command or show the previously installed version. In order to start using the JDK installed by us from the command prompt, we might be required to set the environment variable. You can follow the below-mentioned steps to do so.
Right Click -> My Computer(This PC) -> Properties -> Advanced System Settings
The above steps will open the Windows settings panel as shown in Fig 7.
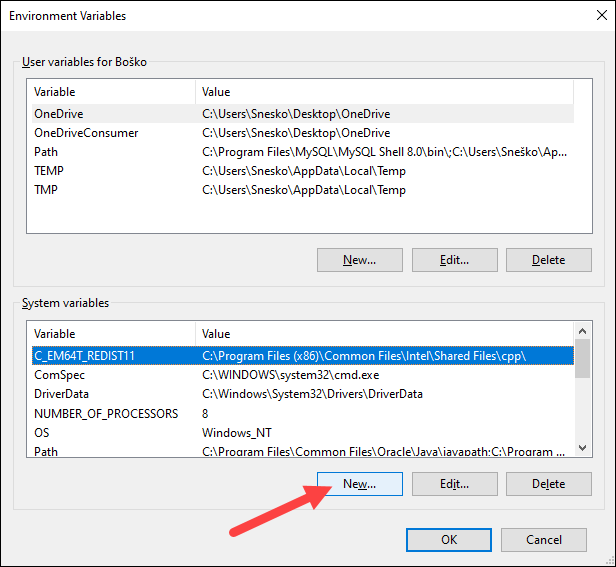
Now click the Environment Variables Button, select Path under the System Variables section, and click the Edit Button. We need to add the path of the installed JDK to the system Path.
Notes: The installer might add the path to System Path. We can delete it as shown in Fig 8.
Remove the path of the previously installed JDK. Also, update JAVA_HOME in case it’s already set. Now click on New Button and add the path to the installed JDK bin which is C:\java\oracle\jdk-17\bin in my case as shown in Fig 9. Press the OK Button 3 times to close all the windows. This sets the JDK 17 on system environment variables to access the same from the console.
Now again open the console and test the Java version as shown in Fig 10.
Getting started with Java — Hello World
In this step, we will write, compile, and execute our first program in Java using the standard Hello World example.
Now write the first Java program as shown below, save the program as HelloWorld.java and exit the editor. Make sure that the class name and file name are the same.
Now open the command prompt and navigate to the path where you have saved your Java program. Use the below-mentioned commands to compile and execute the program.
These are the easy-to-install steps required to install Oracle Java on Windows and write, compile and execute the Java program.
Как установить java 17 на windows 10
For any text in this document that contains the following notation, you must substitute the appropriate update version number:
For example, if you are downloading the JDK installer for 64-bit systems for update 17 Interim 0, Update 0, and Patch 0, then the file name jdk- 17 . interim.update.patch _windows-x64_bin.exe becomes jdk- 17 _windows-x64_bin.exe .
JDK Installation Instructions for Windows
You run a self-installing executable file to unpack and install the JDK on Windows computers.
Install JDK on Windows computers by performing the actions described in the following topics:
Downloading the JDK Installer
Access Java SE Downloads page and click Accept License Agreement . Under the Download menu, click the Download link that corresponds to the .exe for your version of Windows.
Download the file jdk- 17 . interim.update.patch _windows-x64_bin.exe .
Verify the successful completion of file download by comparing the file size on the download page and your local drive. Alternatively, you can ensure that the downloaded file’s checksum matches the one provided on the Java SE Downloads page.
Installing the JDK from the JDK .exe Installer
- Start the JDK 17 installer by double-clicking the installer’s icon or file name in the download location.
- Follow the instructions provided by the installer.
- After the installation is complete, delete the downloaded file to recover the disk space.
During installation, the following files are copied to the location mentioned:
Alternatively, you can run these executables directly from the JDK’s bin directory.
Installing the JDK from the MSI Enterprise Installer
The JDK MSI Enterprise Installer is packaged as a .msi installer and runs with minimal dialogs. It supports silent installation of the JDK and is customizable using command line parameters.
You must have administrative permissions install JDK 17 .
- Download jdk- 17 _windows-x64_bin.msi .
- Double click the .msi file to run the installer.
Installing the JDK from the Command Line
You can install the JDK by downloading the appropriate Oracle JDK MSI Enterprise Installer for your system and running it from the command line.
- Download jdk- 17 _windows-x64_bin.msi .
- Open an MS-DOS prompt with Administrative permissions.
- Run one of the following commands depending on the type of installation that you want to perform:
- Basic UI mode:
- Silent mode:
installer.msi is the name of the MSI Enterprise JDK Installer that you obtained in the previous step.
Creating a Log File
You can use a log file to verify that an installation succeeded.
To create a log file describing the installation, append /L C:\ path \setup.log to the install command and scroll to the end of the log file to verify.
The following is an example of creating a log file:
In this example, the log is written to the C:\ path \setup.log file.
Installing the JDK Silently
Instead of double-clicking or opening the JDK installer, you can perform a silent, non interactive, JDK installation by using command-line arguments.
- The notation jdk stands for the downloaded installer file base name, such as jdk- 17 _windows-x64_bin.exe .
- You don’t need to run the ADDLOCAL command anymore as everything gets installed by default.
Beginning to Use the JDK
Use the Java Development Kit in the Windows Start menu to access information related to Reference Documentation.
During JDK install, Java menu items are added to the Windows Start menu to provide easy access to Reference Documentation, which is online documentation web page.
During JDK installation and uninstallation processes, the appropriate start menu items are updated so that they are associated with the latest JDK version on the system
The Windows 10 has a Start menu; however, the menu is not available in Windows 8 and Windows 8.1. The JDK and Java information in Windows 8 and Windows 8.1 is available in the following Start directory: %ALLUSERSPROFILE%\Microsoft\Windows\Start Menu\Programs .
Uninstalling the JDK on Windows
Uninstalling the JDK in Silent Mode
You can use the command line for uninstalling the JDK.
For example, to uninstall JDK 15, run the command:
- This command can be run from anywhere.
- The msiexec.exe executable is located in the windows system directory.
- A reboot is required only if some files are in use during uninstallation; it is not necessary everytime. However, to manually suppress reboot while uninstalling, append REBOOT=R option to the command.
- Append /l “C:\< path >setup.log” option to the command if you want to create a log file describing the uninstallation status.
Windows Installer dialog appears prompting you for confirmation. Click Yes to uninstall JDK.
Finding the JDK Registry Key and UninstallString Value
- Go to Start and type Regedit .
- In the Registry Editor, go to HKEY_LOCAL_MACHINE/Software/Microsoft/Windows/CurrentVersion/Uninstall .
Under the Uninstall folder, you will find many registry entries within curly brackets.
Highlight Uninstall folder before performing search for a particular registry.
The registry key is highlighted on the right-hand side of the pane and values of various uninstall strings are displayed on the left-hand pane.
JDK Installation Troubleshooting
The topic provide tips for resolving issues while installing JDK.
System Error During Decompression
If you see the error message: system error during decompression , then there might not be enough space on the disk that contains the TEMP directory.
Program Cannot Be Run in DOS Mode
If you see the error message: This program cannot be run in DOS mode , then do the following:
Open the MS-DOS shell or command prompt window.
Right-click the title bar.
Select the Program tab.
Ensure that the item Prevent MS-DOS-based programs from detecting Windows is not selected.
Select OK again.
Exit the MS-DOS shell.
Restart your computer.
Characters That Are Not Part of the System Code Page
The associated bug number is 4895647.
Cleanup the Registry After a Failed JDK Uninstall
Sometimes, attempts to uninstall JDK through the Windows Add/Remove program leave behind some Java entries in the registry that are not fully removed. These left behind registry entries can cause problems in installing a new version of Java. The following are the methods to cleanup registry entries:
- Program Install and Uninstall troubleshooter (Recommended Method)
- Manual Registry Edit
Program Install and Uninstall troubleshooter (Recommended Method)
Run the Program Install and Uninstall troubleshooter to repair the corrupted registry keys that prevent programs from being completely uninstalled, or blocks new installations and updates.
Manually edit the registry (Use this only if the Fix It utility does not work)
Incorrectly editing your registry may severely damage your system. You should back up any valued data from your computer before making changes to the registry.
Use the File->Export functionality of the registry editor to save the registry key before deleting. In case you deleted the wrong registry key, you can restore the registry from your saved backup file, by using the File->Import functionality.
To delete the registry key:
Highlight the key, Right click and select Delete .
Click Yes when prompted.
The JDK gets uninstalled.
Fixing Shim Situation when JDK 17 and JRE 8 is Installed
When you install JDK 17 and then install JRE 8, and then run the java -version command, 1.8.0 is displayed in the output instead of 17 . This is because the javapath is placed before JDK 17 location in the user environment path.
This is a bug with the JRE 8 installer. To fix this shim situation, uninstall and reinstall JDK 17.
How To Install Java 17 On Windows
It provides all the steps required to install Oracle Java 17 i.e. Oracle JDK 17 on Windows 10 and get started with Java using the Hello World example.
This tutorial provides all the steps required to install the Oracle Java 17 officially distributed by Oracle for Windows. It provides the steps required to install Oracle JDK 17 on Windows 10. The steps should be the same for other versions of the Windows operating system.
Notes: The official installer provided by Oracle does not include the bundled JRE with JDK since Java 11. It can be installed separately if required. We can use Java 17 free for general-purpose computing usage. You can also, follow How To Install OpenJDK 17 On Windows to install the open-source version of Java 17 i.e. OpenJDK 17. Java 17 is using the Commercial License and OpenJDK 17 is using the open-source GNU General Public License v2, with the Classpath Exception (GPLv2+CPE).
Java 17 is an LTS version which means there will be long-time support from Oracle for the same. The premier support will be available till September 2026 and extended support will be available till September 2029.
You may also install the popular IDEs to develop Java applications by following — How To Install Eclipse For Java On Windows, How To Install IntelliJ IDEA for Java on Windows, How To Install NetBeans On Windows, and How To Install VSCode For Java On Windows. You may also follow the How To Install OpenJDK 17 On Ubuntu to install the latest OpenJDK on Ubuntu and How To Install Java 17 On Ubuntu to install Oracle JDK.
Notes: New version of this tutorial is available at How To Install Java 18 On Windows.
Step 1 — Download JDK
Open the browser and search for Download JDK 17 or click the link to download from the Oracle website. It will show the JDK download page as shown in Fig 1.
Now click the X64 Installer link to start downloading JDK 17.
Step 2 — Install JDK
Now execute the JDK installer by double-clicking it. It might ask system permission before starting the installation. Click on yes to allow the installer to execute itself. It shows the installer welcome screen as displayed in Fig 2.
Click the Next Button to initiate the installation process. The next screen shows options to change the installation path. We can change the installation location on this screen if required as displayed in Fig 3.
Now click the Next Button to start the installation. It will show the progress as displayed in Fig 4.
It shows the success screen after completing the installation as shown in Fig 5.
Now open the Command Prompt and type the command java -version to confirm whether it’s installed successfully as mentioned in Fig 6.
It might show the message — java is not recognized as an internal or external command or show the previously installed version. In order to start using the JDK installed by us from the command prompt, we might be required to set the environment variable. You can follow the below-mentioned steps to do so.
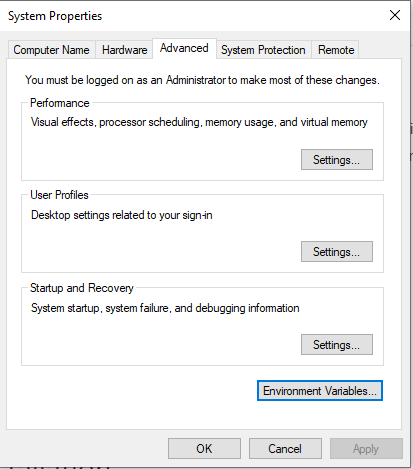
Right Click -> My Computer(This PC) -> Properties -> Advanced System Settings
The above steps will open the Windows settings panel as shown in Fig 7.
Now click the Environment Variables Button, select Path under the System Variables section, and click the Edit Button. We need to add the path of the installed JDK to the system Path.
Notes: The installer might add the path to System Path. We can delete it as shown in Fig 8.
Remove the path of the previously installed JDK. Also, update JAVA_HOME in case it’s already set. Now click on New Button and add the path to the installed JDK bin which is C:\java\oracle\jdk-17\bin in my case as shown in Fig 9. Press the OK Button 3 times to close all the windows. This sets the JDK 17 on system environment variables to access the same from the console.
Now again open the console and test the Java version as shown in Fig 10.
Getting started with Java — Hello World
In this step, we will write, compile, and execute our first program in Java using the standard Hello World example.
Now write the first Java program as shown below, save the program as HelloWorld.java and exit the editor. Make sure that the class name and file name are the same.
Now open the command prompt and navigate to the path where you have saved your Java program. Use the below-mentioned commands to compile and execute the program.
These are the easy-to-install steps required to install Oracle Java on Windows and write, compile and execute the Java program.
JDK 17 Installation on Windows 10 [step-by-step]
This article shows you the JDK 17 installation on Windows 10 operating system. The JDK 17 is the latest Long Term Support (LTS) release by Oracle as of January 2022.
The Java Development Kit (JDK) is a development environment for building applications and components using the Java programming language. The JDK includes tools for developing and testing programs written in the Java programming language and running on the Java platform.
Please enable JavaScript
Table of Contents
Software Dependency
- JDK 17
- Windows 10
Here we are going to download JDK 17 and install it on the 64-bit Windows 10 Operating System.
How to Download JDK 17 and Install it on Windows 10?
The installation process of the Java Development Kit (JDK) on the Windows operating system is very simple. Just follow the below steps:
- Download JDK 17 for Windows 10 64-bit
- JDK 17 Installation on Windows
- Setup System Environment Variables
- Verify the Java Installation
Step-1: Download JDK 17 for Windows 10 64-bit
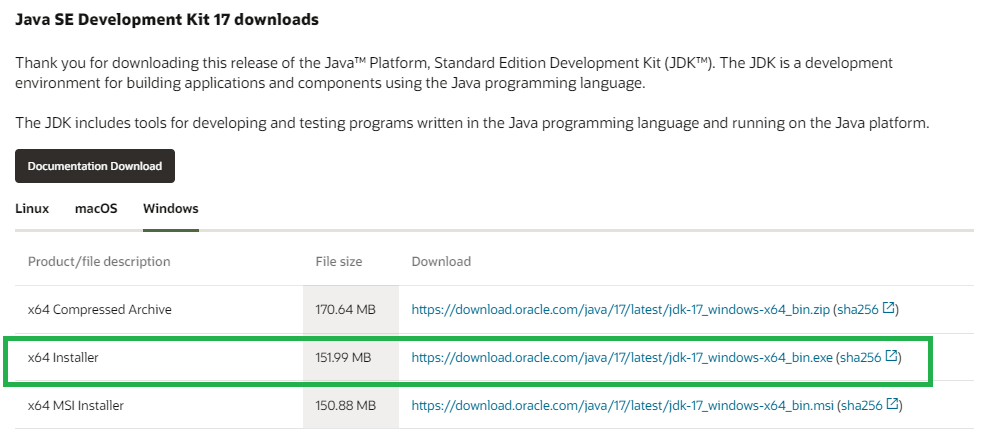
To download JDK software, visit its official website Oracle Website’s Java and go to Java SE Development Kit 17.0.2 and click on the highlighted link as shown in the below image.

Once you click on the link (https://download.oracle.com/java/17/archive/jdk-17.0.2_windows-x64_bin.exe), it will start the downloading of JDK software.
NOTE: Oracle requires an account (sign-in) to download older versions of Java that are no longer available to the public. You can download publicly available versions of Java without signing in which is the latest version only.
Step-2: JDK 17 Installation on Windows
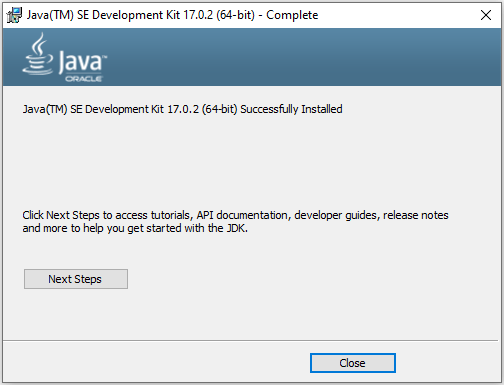
Once you have downloaded the JDK 17 software (jdk-17.0.2_windows-x64_bin.exe), double click on it to see the start of the installation process.

Now click Next to see the below image, Here you have a choice to change the java installation directory by clicking on the change… button otherwise simply go with the default path by clicking the Next > button. I am going here with the default path only.
Once you click the Next, you will see the start of the installation process as below image. After successful installation, you just close the installation wizard.
Step-3: Setup System Environment Variables
System Environment Variables path:Right click on MyComputer -> properties -> Advanced System Settings -> Environment variables
Now click on the Environment Variables button > add JAVA_HOME & Path as shown in the below images:
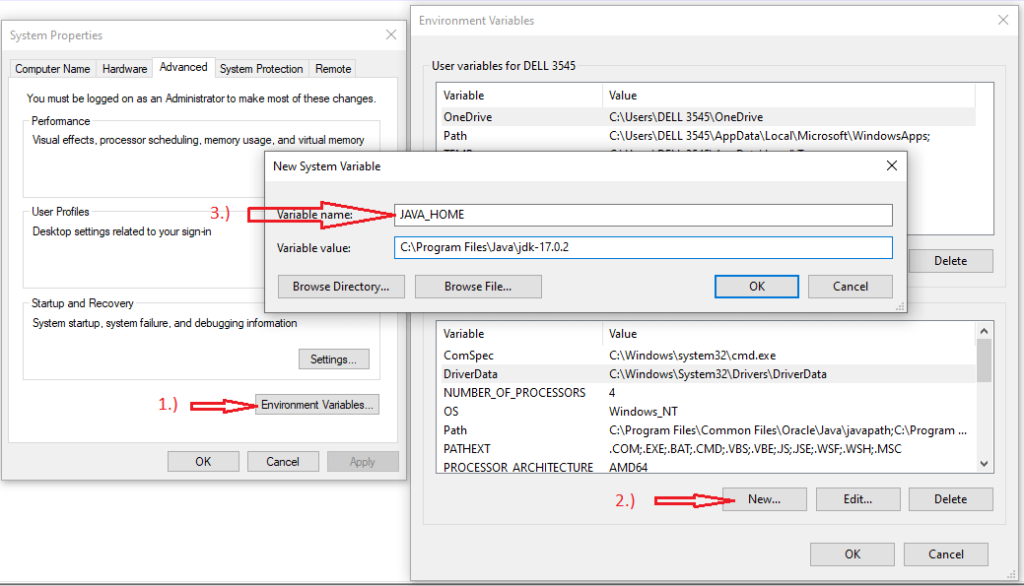
Now we should have to add Java Path. If the Path variable is already there then simply we can click on the Edit… button > then click the New button to add the path as below image.
Step-4: Verify the Java Installation
To verify the installation open the command prompt(Win+R key and type cmd) and then type java -version and press Enter key.
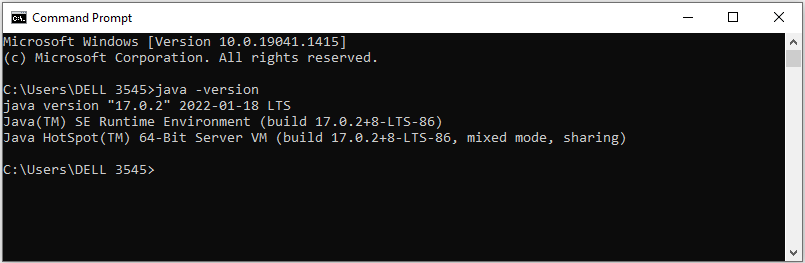
Congratulations! You have been successfully installed the Java Development Kit (JDK) 17 on your Windows system.
Conclusion
In this article, you have seen how do you install Java Development Kit (JDK) 17 on the Windows 64-bit Operating system. You have also seen how can you verify the successful installation of JDK software in your machine.
Does JDK 17 include JRE?
No, In JDK 17, JRE is no longer available. In this release, the JRE or Server JRE is no longer offered. Only the JDK is offered.
Download and Install Oracle JDK 17
In this post, I’d like to share with you about how to download and install Oracle JDK 17 from official source, on Windows operating system. Oracle JDK 17 is a distribution of JDK 17 under Oracle’s license.
1. Download Windows Installer for Oracle JDK 17
You should get the file jdk-17_windows-x64_bin.exe downloaded. Note that Oracle also provides SHA256 checksum for the file, for use in case you want to verify integrity of the file:
certutil -hashfile jdk-17_windows-x64_bin.exe SHA256
Compare the output of this command against the value posted by Oracle in the corresponding sha256 link.
2. Install Oracle JDK 17 on Windows
Just click Next to start installing JDK 17 for your Windows computer. It should be very quick. The installer will update Java Path in C:\Program Files\Common Files\Oracle\Java\javapath directory. Now you can open a new command prompt and type java –version to verify:
That means you have successfully installed Oracle JDK 17 on your Windows operating system. If it doesn’t work, follow this guide to update system environment variables for Java manually.
To watch the steps in action, I recommend you watch the following video:
Learn more:
About the Author:
Nam Ha Minh is certified Java programmer (SCJP and SCWCD). He started programming with Java in the time of Java 1.4 and has been falling in love with Java since then. Make friend with him on Facebook and watch his Java videos you YouTube.