Creating A Simple Addon
Be aware not all mods will be made public on the mods page. To prevent disappointments, please first look at the Uploading_Mods page to see which mods won’t be approved for public release.
Introduction
This tutorial is meant to make clear what steps you’ve to take in order to add or create parts to a vehicle. Only the basic is explained; jbeam and texture tutorials are explained in other tutorials and wiki pages. With this tutorial the basic are explained for making a simple object in game or modifying (modding) a current vehicle.
An object in BeamNG consists basically out of two parts; the visual part and the parts which defines how the object behaves in game. The visual part consists out of the 3D model (also called flexbody) and its textures, the latter is the jbeam, which basically is the skeleton of the object. It has nodes which are connected by beams. The geometry of this structure combined with the properties of the beams makes how the object behaves. The materials are also important, those link the textures with the mesh.
Preparation
First of all, try to work out what you want. Make simple drawings, look up some info and pictures of real-life counterparts. If you want to recreate a existing object or a imaginary object based on real life object, best is to have pictures of this object taken from directly the side, front and top, preferably with at least as possible perspective. Even for a imaginary object it is very important to have the proportion correct. There are also webpages on the internet dedicated to so called blueprints, those are ideal for recreating parts in a 3D drawing program.
Creation
The Basics
If you’ve got all necessary information you think you need, a 3d model has to be made or found. In case you’re using a mesh made by someone else, be VERY sure you’re allowed to use it, and even better, you’re allowed to release it. Mods using 3D models made by someone else than the uploader will be removed if it’s unclear if the 3d model used is uploaded with permission of the creator of the 3D model. You’re free to use any 3D program you like, but Blender is one of the most used programs in this community. It is freeware and can be downloaded via their website.
Now it is necessary to have a location to have all the modded files. BeamNG is designed in a way that it is possible to simply add new parts without having to adjust the official files.
You might already know the mod directory in the BeamNG documents folder (USERNAME\Documents\BeamNG.drive\mods). If you add a folder named ‘vehicles’ and in this folder you’ve to add a folder with the vehicle’s name. So for example if you’re adding or modding files for the Gavril Grand marshal, you’ll need a folder structure like «USERNAME\Documents\BeamNG.drive\mods\vehicles\fullsize». The name of the vehicles folder isn’t clear in some cases, you’ll have to search in the folder «SteamApps\common\BeamNG.drive\content\vehicles» the vehicle of your choice. Also the original files can be found in these folders, this can be useful if a part is based on a official part or in case it has to be adjusted to a vehicle.
The Flexbody
Now we’ll take a look at a official 3D models in the game. Both examples of modding use the GM as bases, so we’ll go to folders official location (SteamApps\common\BeamNG.drive\content\vehicles\fullsize\). Search for the fullsize.DAE, and copy this file to a free-to-chose location where you can store newly made parts and make backups. Do not put it in the mods folder! How to open and save a .dae look here.Also, the game is able to read multiple .dae’s at once, if you want to add a part you can simply have a .dae with only this file in the proper mod location. Multiple dae’s in one folder is possible as well. More info about this so called ‘Multi-DAE’ can be found here. For more information about modeling and texturing look here: Modeling_and_Texturing_Guide
Materials
In this .DAE you’ll see the materials of most parts of the fullsize are called ‘fullsize’. This corresponds to the materials.cs file in the fullsize folder; if you open this file you’ll see the fullsize material is linked to some texture files. Sometimes if you copy a part in Blender the material is changed to fullsize.001 for example. If this part should use the original fullsize texture maps one has to alter this. If you want to add new materials to this mod, a new materials.cs file has to be made. Look in the official materials file how it should look like (more info here: Vehicle_Materials), and store this file inside a new uniquely named folder inside your mods folder like «. \BeamNG.drive\mods\vehicles\fullsize\materialsofMODNAME\materials.cs» so it won’t interfere with the original materials file.
The JBeam

If you’ve got a nice model, you’ll have to make a jbeam for it. When having a part based on a original one, most of the time it is easiest to copy the official jbeam and adjust it. To make things clear, there’s the filename, the jbeam name, the jbeam ‘screen’ name, the slot name and the flexbody name. If you add a part, make sure that at least the first three names are different compared to the original one. If either the filename or jbeam name are still the same, it will sort of ‘overwrite’ the original part, making the original version unusable. The screen name is the name which appears in the part selector, it has to be clear which part it is. The flexbody name is obviously the name of the flexbody. When choosing names, make sure you use a unique names so it wouldn’t interfere with official parts but also not with possible other mods! A more extensive explanation about jbeams can be found here: JBeam_Reference Thereby there are multiple wiki pages explaining the various sections of a jbeam. If you’re making a part which needs a slot which doesn’t exist or isn’t available, one can use the so-called modslot. More info can be found in the Simple_Mod_Slot_Tutorial Wiki page.
Finishing, Packaging and Uploading
If you think you’ve finished it, the .dae and the corresponding jbeams are in the right folder, it should pop up in the parts selector (CTRL-W) in-game. If the game freezes, its telling you there’s something wrong. Enter the console (the key differs, but usually is ‘`’) and scroll up the red lines until you see the beginning of these red lines. Here it should be explained what’s wrong. Fix it, press ctrl-R to try again.
If you want to release your mod, you’ll have to put the files into a zip file. Folder hierarchy and naming is quite important; the zip file should have its unique name (be sure it won’t interfere with other mods), inside this folder you need to have a ‘vehicles’ folder, inside this folder there has to be a folder named with the vehicles name and inside this folder there are the files. Example: «myfullsizemod.zip\vehicles\fullsize\files»
If you’ve successfully tested your mod you should be finished! You can go to BeamNG’s resource page and ‘Add resource’. After uploading, your mod will be tested if it functions properly and if it hasn’t copyright issues before being released.
A more extensive guideline can be found at Uploading_Mods
Updating
To make sure that when you want to update your mod your files won’t interfere with files of old versions of you mod, make sure the names of the .DAE files and the zip files stay the same over the different versions. Failing to do so might result in unstable and unwanted behavior; your mod might use files out of multiple version simultaneously. Although BeamNG’s dev team puts in lots of effort to keep old mods usable on the latest versions, it might happen your mod gets outdated and won’t function as intended. The JBeam_changelog page shows the main changes which were made during an update.
Гайд по моддингу номерных знаков
Не так давно в BeamNG Drive была добавлена новая возможность создавать собственные номерные знаки для машин. В этой статье вас ждет подробный гайд по моддингу этой части игровой модели в BeamNG Drive.
Все что вам понадобится для работы с номерными знаками, это графический и текстовый редактор. Мы рассмотрим работу на примере GIMP и notepad++.
Подготовка
Для создания правильно работающего мода на номерной знак нам понадобится по крайней мере три файла: jbeam файл, json файл и текстурный файл.
Jbeam файл содержит всю релевантную информацию о вашем номерном знаке и обозначает путь к соответствующему json файлу.
В тоже время json файл содержит пути ко всем текстурным файлам, которые вы собираетесь использовать в вашем моде.
Более того, вам нужно будет иметь по крайней мере одну фоновую текстуру для вашего номерного знака.
Создание мода
Подготовка структуры файлов
Следуйте по следующему пути:
Создайте несколько папок соответствующих пути к файлам мода. В итоге у вас должно получиться что-то подобное:
«C:\Users\%USERNAME%\Documents\BeamNG.drive\mods\unpacked\username_mod\vehicles\common\licenseplates\username_license_plate\»
Измените выделенные жирным части на ваше название для мода. Только убедитесь что ваше название уникально, чтобы избежать проблем с модами других пользователей или официальным контентом игры.
Названия username_mod и username_license_plate определяют как будет называться ваш мод в игре.
Создание текстуры
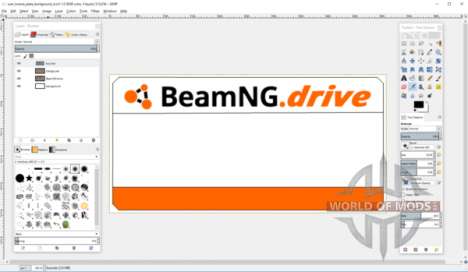
Откройте GIMP или любой другой графический редактор. Мы собираемся создать фон нашего номерного знака. Текстура для фона имеет разрешение 512 на 256 пикселей — используйте только это разрешение.
Используйте этот шаблон для создания вашего собственного фона для номерного знака. Помните, что вам нужно создать шаблон без текста на нём. Текст мы будем добавлять в другом месте.
Как только закончите, экспортируйте получившийся файл в формате .png в папку, созданную ранее и дайте ему уникальное имя.
Создание json файла
После того как мы закончили создание текстуры, нам нужно создать еще и json файл, который будет обеспечивать связь между шаблоном номерного знака и, собственно, текстурой.
Как сделать мод для бименджи драйв
Reddit and its partners use cookies and similar technologies to provide you with a better experience.
By accepting all cookies, you agree to our use of cookies to deliver and maintain our services and site, improve the quality of Reddit, personalize Reddit content and advertising, and measure the effectiveness of advertising.
By rejecting non-essential cookies, Reddit may still use certain cookies to ensure the proper functionality of our platform.
For more information, please see our Cookie Notice and our Privacy Policy .
Get the Reddit app
BeamNG.drive is a realistic and immersive driving game, offering near-limitless possibilities and capable of doing just about anything! BeamNG in-house soft-body physics engine simulates every component of a vehicle 2000 times per second in real time, resulting in realistic and high-fidelity dynamic behavior.
Or is it just too tough? I have a basic idea but I just want a comprehensive guideline from scratch to end for a basic model and then work my way up from there.
If it is really very difficult, then Kudos to the existing modders and perhaps, I should look for inspiration elsewhere 🙁
Как сделать скин для beamng drive
Особенности мода:
— УСТАНОВИТЬ: перетащите zip в моды
— HQ 3D модель / Поддержка PBR
— Интерьер HQ
— HQ двигатель.
Особенности мода:
— УСТАНОВИТЬ: перетащите zip в моды
— Поддержка HQ 3D Model / PBR paint
— HQ интерьер
— HQ двиг.
cimtc это брат etk
Mazda 6 для BeamNG Drive. Мод среднего качества. Из плюсов: несколько конфигураций, PBR материалы, крутится руль, рабочая оптика, хорошая.
Особенности мода:
— УСТАНОВИТЬ: перетащите zip в моды
— HQ 3D модель / Поддержка PBR
— Интерьер HQ
— HQ двигатель.
Комплексный мод Kia Cadenza для BeamNG Drive Мод среднего качества, из плюсов: +несколько конфигураций +хороший салон +рабочие фары +прор.
Целью создание мода было добавление частей для стандартной техники которые были упущены из вида. Мод добавляет более 100 частей, модифика.
— Рабочая оптика;
— PBR текстуры;
— .
• Спойлер в стиле CSL
• Панорамная стеклянная крыша седана (скоро)
• Разделители заднего бампера
• .
Как сделать скин для beamng drive

Во время игры у вас могут возникнуть разные вопросы:
" Как установить мод",
" Как добавить бота",
и другие. )
В этом руководстве я дам ответы на эти вопросы и на многие другие.)


How to create a vehicle for BeamNG?
![]()
I have seen the wiki tutorial, so please point me out preferably a YouTube tutorial. I have also seen this thread but it is very old and already revived twice and dead now. Should I reply again on it? I am surprised there is so much tutorial out there for Autodesk 3DS Max among other things but BeamNG Modding tutorials are scarce and incomplete.
Or is it just too tough? I have a basic idea but I just want a comprehensive guideline from scratch to end for a basic model and then work my way up from there.
If it is really very difficult, then Kudos to the existing modders and perhaps, I should look for inspiration elsewhere 🙁
Моды раздела «Текстуры (скины)» 19
Скин-пак для Skoda 1203 советских ливрей экстренных служб — штабного автомобиля пожарной охраны, автомобиля дежурной части ГАИ, автомобиля линейной скорой помощи и автомобиля аварийной газовой службы. Мод предназначен для автомобиля Skoda 1203 автора Vehicular Bonanza.
Также в набор входит пак сирен СГУ-60, записанных с реальных сохранившихся образцов. Сирены подписаны и имеют маркировки «Скорая помощь», «ГАИ», «Пожарная охрана».