Backups
Where <world> is the world to backup. Leaving <world> off will back up all worlds.
By default, backups are saved in /opt/mscs/backups . The location backups are saved can be configured by changing mscs-backup-location in mscs.defaults or the world’s mscs.properties config file (See Adjusting World & Server Properties).
Scheduling Backups
To schedule backups so they run periodically, please see scheduling tasks.
Cleaning Backups
Backups are automatically cleaned whenever a backup runs.
You can manually clean up the backups created by running the mscs clean-backups command.
Viewing & Restoring Backups
You can view the backups created by running the mscs list-backups command, and restore a backup using the mscs restore-backup command.
You can specify how long to keep backups by changing the mscs-backup-duration property in mscs.defaults or the world’s mscs.properties config file (see Adjusting World & Server Properties).
Restoring Backup Example
To list the date and time of all available backups for a world named alpha :
Backup and Run Your Minecraft Server with Batch Files
![]()
Are you getting tired of how complex it is to start or backup your Minecraft server? What if there was simply a file or two that you can just double-click and get on with your game? Well, you’ve come to the right place. You see, I was ALSO very tired of all the copy and paste that I was being made to do. Not to mention, Windows CMD, and even running java commands are a little scary to work with if you have never touched it before.
What Can We Do About It
To help Minecraft players, I created a file that you can double-click to run your server! As a bonus, I added another file that helps to backup your server as well. You can think of it as a “quick save” before you do something crazy (like oh you know, burning your friend’s house or attacking the nether piggies).
As a disclaimer, this is a solution for Microsoft Windows users only, but if you have a Mac and you’re interested, leave a comment down below and I’ll work on one for you too!
Setting Up Your Minecraft Server For the First Time
Note: You can skip this section if you already have your Minecraft Server all setup!
Just so you know, we are simply following the official Minecraft Website’s instructions for this one. Even though it might be tricky, if you complete this tutorial you will only have to do it once!
- Download the “.jar” file from the Minecraft Website here
- Move the “.jar” file to the desired folder, let’s name it “Minecraft Server”
- Shift+Right-Click in the folder and click on “Open PowerShell Window Here”
- Open the Powershell window, and paste into it the command that the Minecraft Website link from step #1 provided. For example today the website is showing this one command below.
- Press Enter. The Powershell window will take some time and likely give you the message of “I need you to accept the Eula please”. So just go back into your Minecraft Server folder and you will see the new EULA file, open it and set the value in there from “false” to “true” and save the file
- Repeat Steps #3 and #4, and the PowerShell Window should show you a progress % number as it loads up your server. When you see the word “Done!” then that means the server is running and ready to play!!
- When you look at your Minecraft Server folder it should now have a bunch of files. The “world” folder is the one you need to backup as it holds all of your worlds and player data.
Keep reading to know about a way to make your life easier in running this server for next time.
Anyways, Here Are Instructions On Starting Your Server The Easy Way
Here are the steps:
- Download the files here on my GitHub and click “Download Zip” (or just clone it)
- Extract the three files to your existing Minecraft Server Folder (if you don’t have this yet, simply follow the steps in the section above)
- To Run your server, double click on “START_SERVER.bat”!
- You should see a window pop up and you will know the server is ready once you see the word “Done!”
And that’s all! To stop your server safely (kind of like pulling out a USB safely), just type:
into the server window and give it some time to close on its own.
Instructions on Backing Up Your Server The Easy Way
Assuming you have downloaded my files from the above section, we can continue to talk about how to backup your server!
Как сделать бэкап сервера майнкрафт
Создание резервных копий сервера Minecraft через Game Panel
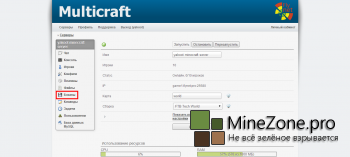
Для того чтобы создать резервную копию, перейдите на Ваш сервер Minecraft, выбрав Instance -> Manage:

Затем выберите Backups:

Имейте в виду, что для того, чтобы после восстановления резервной копии изменения вступили в силу, необходимо перезапустить сервер Minecraft.
Хостинг Minecraft : Резервные копии

Мы делаем хостинг Minecraft уже не первый год и получали много подобных вопросов от наших клиентов — как откатить, восстановить Minecraft сервер на определенную дату в прошлом.
Мы разработали универсальное решение, позволяющие раз и на всегда решить проблему сохранности и восстановления данных сервера. О нем я и хочу вам рассказать.
Существует несколько плагинов для Craftbukkit (MineBackup, WorldBackup, Backup и др.) выполняющих подобные задачи, но у всех них есть свои недостатки:
- Плагины нужно устанавливать. Забыл установить плагин — нет бекапа.
- При создании резервной копии большого сервера часто могут проявляться лаги. Не удивительно. Архивация происходит внутри Java машины.
- Как правило, резервные копии, создаваемые плагинами, лежат в директории самого сервера. А значит, занимают общее место на диске и могут быть потеряны вместе с сервером.
Наша система резервного копирования работает иначе и, как показывает практика испытаний за 3 месяца , весьма удачно.
1. Каждый созданный Minecraft сервер автоматически подключается к системе резервного копирования. Это происходит в фоновом режиме. Не нужно ничего устанавливать или настраивать. Достаточно просто создать сервер на хостинге Minecraft от www.flynet.pro
2. Система бэкапов находится логически «снаружи» сервера. То есть для создания резервных копий не расходуются ресурсы вашего сервера (ни CPU, ни место на диске). Ваш сервер даже не догадывается, что его систематически копируют. Впрочем, Вы тоже можете не догадываться, пока не понадобится копия.
3. Резервное копирование запускается каждую ночь. В результате Вы можете восстановить сервер на любой день в прошлом, начиная со дня активации сервера.
4. Можно Восстановить как весь сервер целиком за 1 клик, так и извлечь конкретный файл, к примеру, конфиг определенного плагина.
5. Копируются все данные сервера: карта, вещи игроков, плагины, моды, файлы конфигурации.
6. Все резервные копии складываются в отдельном, независимом дата-центре. Данные передаются по гигабитному каналу. Мы сможем быстро восстановить ваши сервера даже в случае выхода из строя основного нашего дата-центра .
7. И, да. Это бесплатно 🙂
Вот так выглядят сервера, на которых мы храним ваши бекапы.
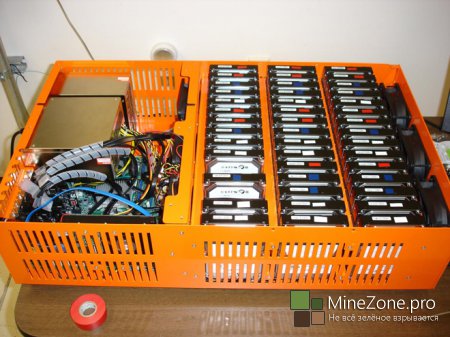
По 45 дисков в одном сервере. Мы объединяем диски в массивы. В такой схеме даже выход из строя нескольких дисков позволяет сберечь данные.
А теперь, как этим пользоваться? Очень просто.
1. Авторизуемся в панели управления mygame.flynet.pro или заходим из личного кабинета.
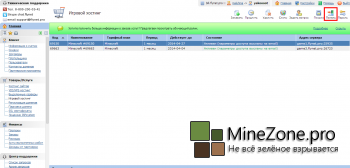
2. Переходим в пункт Меню Бэкапы.
3. Задаем параметры восстановления сервера.
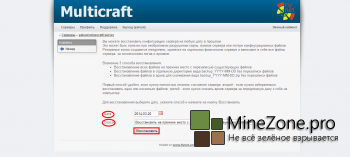
- Восстановление всех файлов на прежнее место с перезаписью существующих файлов.
- Восстановление файлов в отдельную директорию вида backup_YYYY-MM-DD без перезаписи файлов.
- Восстановление файлов в архив для скачивания вида backup_YYYY-MM-DD.zip без перезаписи файлов.
Для восстановления выберите дату, укажите способ и нажмите на кнопку Восстановить.
Сервер восстановится в течение 1-5 минут, в зависимости от его объема. Как видно — все просто.
Теперь Вы можете не переживать за сохранность своих построек. Мы надежно бережем Ваши данные.